Download the simulation files which correspond to the two examples in this blog post:
[wpdm_package id=’7543′]
In this week’s blog post we will look at the directed mesher. In a previous blog post we looked at How to create a directed mesh in Simecnter STAR_CCM+, and now we will look at how to create a directed mesh based on an existing mesh. This we will do by looking at two different examples, where the simulation files can be downloaded from the link above. If you are interested in details about the set-up we suggest to download the simulation files and deep-dive into the strategies and techniques used yourself.
Example 1: Directed mesher for a U-pipe
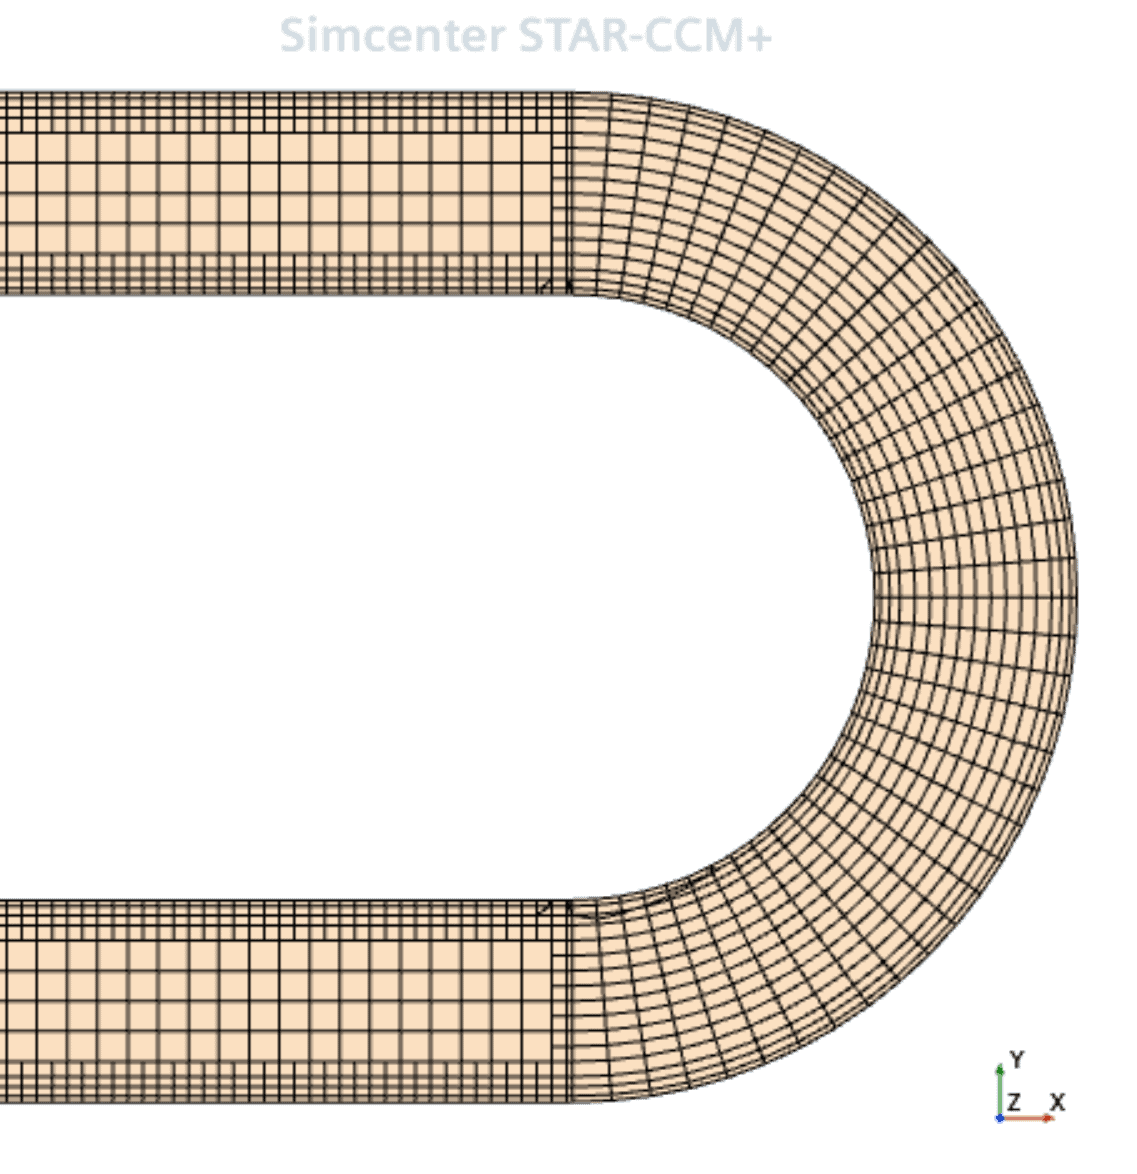
One example where it can be useful with creating a directed mesh based on an existing mesh is for a U-pipe. In the picture below you see a 180-degree bend where flow comes from the lower end and flows out of the upper end.

Generating a good mesh for the straight parts of the pipe is not difficult, but the bended part can be a little bit trickier. With the directed mesher though, you can use the existing mesh from the straight part of the pipe as an input to the directed mesher and sweep the mesh over the bended part to obtain a mesh like in the picture below.

In this example the U-pipe is divided into three sections:
- The bended pipe is called Body 1
- The lower pipe is called Body 2
- The upper pipe is called Body 3
In the picture below you see the operation structure with how the settings for the directed mesher are defined. The surface mesh created at the lower pipe at the interface towards the bended pipe is used as input to the directed mesher, and therefore the lower pipe mesh must be generated first in its own mesh operation. See the downloadable file “U-pipe_simulation_Cleared.sim” for the exact settings.

Example 2: Simulation with flow around a rod with squared cross-section
The second example in this blog post is using the directed mesher to come around a problem that has been noticed. The problem occurs when having surfaces with different refinement level meeting at a corner Simcenter STAR-CCM+ want to maintain a certain quality of the cells, which is making the prism layer to collapse in the corner. See the picture below, where this is visualized and also zoomed in at the problem. The correct prism layer thickness is obtained further away from the corner at both the top surface and at the refined rod, but not in the corner. The fluid domain in the example is describing flow around a vertical rod with squared cross-section, where flow goes from left to right.

For this domain there is some symmetry to use and therefore you could actually solve this meshing problem with directed mesher based on an existing mesh. The trick here is to create a dummy domain in connection to the domain of interest, and using the existing mesh of the dummy domain as source mesh to sweep the mesh through the domain of interest. In the picture below you see the dummy domain as the upper half of the fluid domain with trimmed cells and the domain of interest with directed mesher as the lower half.

When you have created the directed mesh you can either delete the upper half of the simulation (using trimmed mesh cells) or close it off by setting the interface between the regions as a baffle. Resulting in the computational domain in the picture below, where the domain of interest is using directed mesh.

In the domain of interest you now have a mesh with cells that keep good quality and also having finer mesh at the rod surface. By adjusting the stretching function of how the layer for the directed mesh should grow from top to bottom you can get the same resolution as you would have got from prism layers at the top and bottom surfaces of the domain.
Instruction list on how to perform this mesh technique:
- Create/import fluid domain of interest.
- Copy fluid domain, and translate/rotate the copied domain so surfaces touch at place where source mesh from dummy domain will be imprinted on the start point of sweeping in the directed mesh domain.
- Create imprint operation and execute, to establish contacts between the domains.
- Create regions and continua for both domains.
- Set up a surface mesh operation for the surfaces that touch from both domains. Execute the operation.
- Create volume mesh operation for the dummy domain and execute.
- Set up and execute the directed mesher.
- Delete dummy domain or close it off from the domain of interest by changing the interface to a baffle.
This secound example is included in the blog post to show the possibility of using an existing mesh as source mesh for your domain of interest. There are more complex applications than regions with this simple symmetry that could benefit from this technique, so hopefully this blog post can give you some insiration. See the downloadable file “DirectedMesher_flowAroundRod_usingBaffleAsDivider_Cleared.sim” for the exact settings.
A special thanks to Marian at Siemens who thought me this way of creating a directed mesher and solve the problem with cells collapsing in corners when using different refinement on the surfaces.
We at Volupe hopes that this blog post has been interesting and that you will be able to create nice meshes after reading this. If you have any questions you are always welcome to contact us at support@volupe.com.
Author

Christoffer Johansson, M.Sc.
support@volupe.com
+46764479945


